Tampilkan postingan dengan label BREAKFAST. Tampilkan semua postingan

Oats, Milk, Greek Yogurt, Mango Puree and some Maple Syrup come together to make a delicious healthy breakfast in a Jar. Yes The Mango Cocon...


Oats, Milk, Greek Yogurt, Mango Puree and some Maple Syrup come together to make a delicious healthy breakfast in a Jar. Yes The Mango Coconut Overnight Oats !!

Heyy Peeps!! Good Morning !!

Its actually quite amazing these days to wake up these ever yummilicious Mango Coconut Overnight Oats. This New Year has been all about treating us ( Husband and Wife) to some flavorsome Overnight Oats at least 3 times a week. And its working.

Mango Coconut Overnight Oats

We are not worried thinking what to grab in the morning. At least “Him” as he is aways in a rush to leave for work. Life has become a lot easier, as he just tucks these gorgeous Oats filled Jars into his bag and enjoys them at work. So there is really no pressure of skipping breakfast in the morning.

Isn’t that convenient!!!

Mango Coconut Overnight OatsMango Coconut Overnight Oats

Just incase, you are new to Overnight Oats ( Well am a little grown up than an amateur) then here is how it works. All that you need is 5 minutes for the procedure. Overnight Oats are rolled old fashioned oats soaking in a liquid mixture ideally a combination of milk + yogurt. Stir in a sweetener of your choice and its simple as it sounds. I am not found of Banana’s much, so I end up not adding them for self. But yes for my Husband definitely !

Do all the preparation work the night before and get up in the morning to some amazing breakfast. Absolutely No Cooking Needed!

I known the thought of Cold Oatmeal might be a bit awkward, but Guys it works. Have a spoonful from the Mason Jar and if it really puts you off, heat them for a few seconds in microwave and Enjoy!

Mango Coconut Overnight Oats
Prep Time
5 mins
Total Time
5 mins

This incredibly easy 5 minutes Mango Coconut Overnight Oats is your perfect To-Go Breakfast.

Course    : Breakfast
Cuisine   : American
Servings : 2 Mason Jars
Author    : Sandhya Hariharan

Ingredients
1/2 Cup Rolled Oats
1/4 Cup Greek Yogurt
1/2 Cup Milk | Almond Milk
1 Tbsp Maple Syrup
2 Tbsp Mango Puree
2 Tbsp Chopped Mangoes
2 Tsp Fresh Grated Coconut / Desiccated Coconut

Instructions
1.Combine Oats, Yogurt, Milk , 1 Tsp of coconut and Maple Syrup in a Jar. Give it a good mix. Cover and let it sit overnight in the refrigerator. If you notice the oats has gone
2.To Serve, layer the base of 2 mason jars with 1 Tbsp of Mango Puree .
3.Portion the Overnight Oats between the jars , top it with chopped mango pieces and a fat pinch of grated coconut. Enjoy your Mango Coconut Overnight Oats !!

source : https://sandhyahariharan.co.uk/2017/01/16/mango-coconut-overnight-oats/

Store-bought puff pastry has starred in many a versatile creation around these parts, from baked eggs and sticky buns to tarts and turnovers...


Store-bought puff pastry has starred in many a versatile creation around these parts, from baked eggs and sticky buns to tarts and turnovers. But when it comes to puff pastry’s role in the early a.m., it absolutely steals the show when baked into quick and easy breakfast pastries topped with tangy cream cheese filling and piled high with the season’s freshest fruits.

The real beauty of these bite size snacks is that they’re completely compatible 365 days a year with a wide range of fruit toppings. Opt for plump pomegranate seeds in the winter, hearty rhubarb in the spring, juicy berries in the summer, or crisp apples and pears in the fall. Best of all, they’ll be on your breakfast table in 30 minutes or less.

In need of more quick but impressive morning meals? Don’t miss Raspberry Pinwheel Pastries, Overnight Egg Casserole with Breakfast Sausage or Strawberry Cheesecake Stuffed French Toast.

Craving more? Subscribe to Just a Taste to get new recipes and a weekly newsletter delivered straight to your inbox! And stay in touch on Facebook, Twitter, Pinterest and Instagram for all of the latest updates.

Fruit and Cream Cheese Breakfast Pastries

PREP: 10 MINUTES COOK: 18 MINUTES YIELD: 8 PASTRIES

INGREDIENTS
6 ounces cream cheese, at room temp
2 Tablespoons sugar
2 teaspoons lemon juice
1 teaspoon lemon zest
1 teaspoon vanilla extract
1 (17.3-oz.) package frozen puff pastry (2 sheets), thawed
1 1/2 cups fruit (See Kelly’s Note)
1 large egg
Sanding sugar (optional)

INSTRUCTIONS

1.Preheat the oven to 400°F and line two baking sheets with parchment paper or Silpats.
2.In the bowl of a stand mixer fitted with the paddle attachment, beat the cream cheese with the sugar, lemon juice, lemon zest and vanilla extract until creamy.
3.Unfold the puff pastry sheets onto a lightly floured work surface. Lightly roll the pastry with a rolling pin to seal the perforations. Using a 4-inch round cookie cutter (or glass), cut out four circles from each sheet of puff pastry.
4.Transfer four pastry circles onto each baking sheet, spacing the circles about 2 inches apart. Lightly score a circular border 1/4-inch from the edges then prick the centers of each pastry with a fork. Spread a portion of the cream cheese mixture inside the border of each pastry then top the cream cheese with fruit.
5.In a small bowl, whisk together the egg with 1 tablespoon water. Brush the edges of the pastries with the egg wash then sprinkle them with the sanding sugar (optional). Bake the pastries for 15 to 18 minutes or until they’re golden and puffed.
6.Remove the pastries from the oven and allow them to cool for 5 minutes on the baking sheets before transferring them to a cooling rack to cool completely.

KELLY’S NOTE:
Any type of fruit will work for these breakfast pastries. Opt for your favorite flavors or whatever is in season, such as strawberries, raspberries, peaches, plums, apples or pears.

source : https://www.justataste.com/fruit-and-cream-cheese-breakfast-pastries-recipe/

This healthy, creamy Matcha Chia Pudding is full of fiber and healthy fats to keep you satisfied all morning! It’s perfect with granola and ...


This healthy, creamy Matcha Chia Pudding is full of fiber and healthy fats to keep you satisfied all morning! It’s perfect with granola and fresh fruit.

Hi friends!! I feel like I’ve been gone forever, though I was just away for the weekend. But I still missed you guys!

If you follow me on Instagram, you may know that I competed in Miss Louisiana USA, my last pageant ever, this past weekend. I didn’t place, and that was totally okay with me. My goal was to prep in a healthy way without dieting and overexercising (more about this in a post to come) and to be completely myself. I definitely did all of that and couldn’t be prouder!

Here’s what I’m most proud of: unlike most of the girls, I wasn’t drooling over the greasiest, unhealthiest thing I could eat the night after the pageant. I hadn’t restricted anything in my prep. So when I got home, I just got back to doin’ my thang – eating whole, plant foods.

Some people don’t believe me when I say that I crave roasted Brussels sprouts or a simple piece of fruit with almond butter. That’s what my body loves. Sure, a bowl of snickerdoodle ice cream or some chips & salsa is good for the soul every now and then. But once you’ve been eating whole, plant foods for so long, that’s what you really want.

The point is that the more plants you eat, the more plants you crave. I crave allllll the plants.

I did crave two particular foods when I got back from the pageant: a banana peanut butter sandwich on cinnamon raisin bread (which is happening this week🙌🏼) and chia seed pudding. Specific much?

I posted a picture of this matcha chia pudding on Instagram a few weeks ago, and you guys begged for the recipe. Of course I had to oblige!

Matcha green tea powder provides sustained energy instead of a jittery rush like coffee. The healthy fats and fiber in chia seeds will keep you satisfied all morning, or you can make this as a super healthy snack. Top with granola or nuts for some crunch and, of course, some fresh fruit!

If you make this matcha chia pudding or any of my recipes, snap a pic, post it on Instagram, and tag me @emilieeats!

Tell me: What is something you’re proud of right now?

MATCHA CHIA PUDDING

This healthy, creamy Matcha Chia Pudding is full of fiber and healthy fats to keep you satisfied all morning! It’s perfect with granola and fresh fruit.

Author    : Emilie
Prep Time : 5 mins
Total Time: 5 mins
Yield         : 1-2
Category   : Breakfast

INGREDIENTS

1/4 cup chia seeds
1 1/2 cups non-dairy milk or water (or a combination)
2 teaspoons matcha green tea powder
1/2 tablespoon maple syrup, or 3-4 drops pure stevia extract
1/2 teaspoon vanilla extract
Optional toppings: fruit, granola, seeds, nuts

INSTRUCTIONS

1.In a medium bowl, add chia seeds and non-dairy milk. Stir to combine.
2.In a small bowl, add matcha powder. Add a little hot water; whisk until smooth. (This prevents the matcha powder from clumping when mixed into the chia pudding).
3.Add the matcha mixture, maple syrup and vanilla to the chia seed mixture; stir. Place it in the fridge and let it sit overnight, or at least 2-3 hours.
4.Top with fresh fruit, granola and other toppings.

source : https://www.emilieeats.com/matcha-chia-pudding/

Sweet, crunchy, salty and addictive deliciousness – this is the Best Cinnamon Toast recipe (Creme Brulee Toast) that will give you perfect r...


Sweet, crunchy, salty and addictive deliciousness – this is the Best Cinnamon Toast recipe (Creme Brulee Toast) that will give you perfect results every time!


If you love sweet, crunchy cinnamon toast, then I’ve got a doozy in store for you guys today! This is the most simple cinnamon toast in the world, that is also The Best Cinnamon Toast in the world! Plus it’s one delicious caramelized cinnamon toast that you can make on your stove top!

But it comes with a warning. Eat this cinnamon toast responsibly! Because, let’s be honest, this sweet, caramelly, buttery, salty, crunchy deliciousness that is perfect cinnamon toast, will NEVER be featured in any healthy, super food lists. This is an indulgent snack that will instantly transport you to a sweet place from where you would not want to return. And I promise you, for those few fleeting moments, it’ll all be worth it! 🙂

A stack of caramelized cinnamon toast for breakfast or dessert. Save

For those days when you feel like you don’t deserve what the world has to offer you, this caramelized cinnamon toast is the treat you deserve!

Serve the Best Cinnamon toast like a stack. The shiny caramelized surface is crunchy like a caramel.Save

So why is this the best cinnamon toast?
This toast is made with a simple cinnamon butter, which can be stored in your fridge for whenever you crave for some caramelized cinnamon toast.
It’s made with a good amount of butter and a good measure of sea salt, giving you the most buttery cinnamon toast with a lovely hint of salt.
These cinnamon toasts are made on a pan so that the sugar and butter melt evenly. The butter becomes crispy and flavors the bread, while the sugar caramelizes and forms a delightful caramel crust.
The end result? A buttery cinnamon toast with a creme brulee surface! Soft and crunchy. Sweet and salty. This stuff is addictive!
See how shiny that toast is? That’s the caramelized sugar. Like the top of a creme brulee.

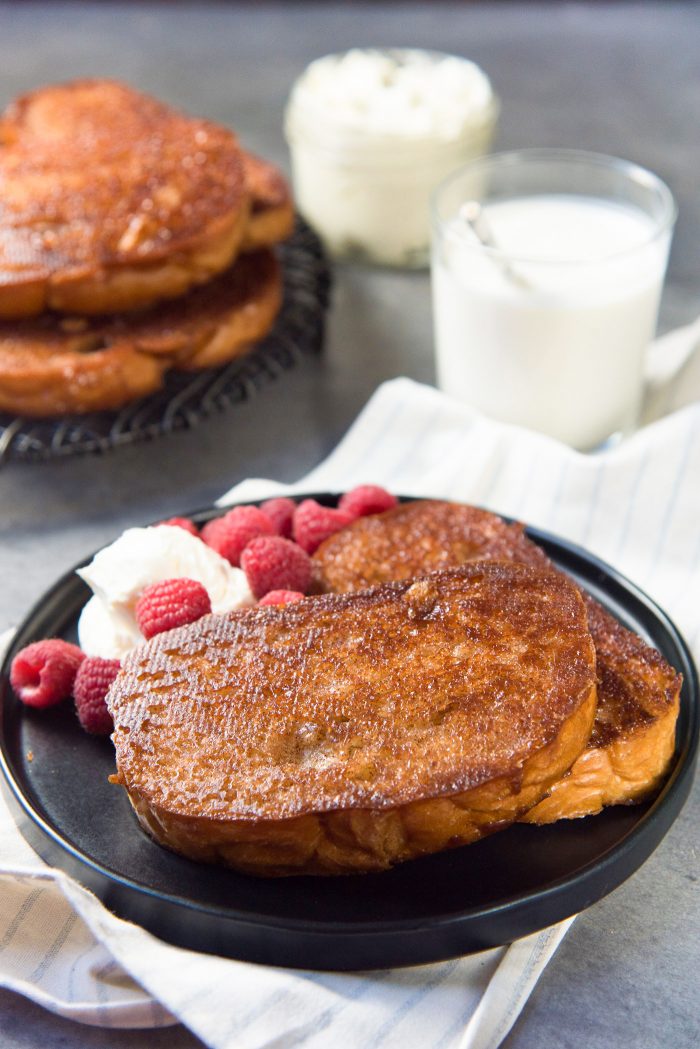
Caramelized cinnamon toast served on a black plate with a glass of milk. Save

Now let’s talk about the cinnamon butter
I based this cinnamon butter on the butter-sugar mix that I used to make for caramel toast that we used to eat as kids. Sugar and butter with toast was a very popular snack for me as a kid for obvious reasons, but the addition of cinnamon happened much later it life. I only use butter, sugar, cinnamon and salt to make this cinnamon butter here, but you can also use any of the following to add more flavor too.

The easiest cinnamon butter to make cinnamon toasts. Easy to make, and you can make batches of it. Save

Vanilla
Nutmeg
Cloves (for a spicy kick)
Black pepper (for a spicy kick)
Orange zest
You also have the option of caramelizing BOTH sides (especially if you like thick slices of bread), or just one side (for thin slices of bread).

Spread an even layer of cinnamon butter on the toast. Make sure to get the edges as well. Save

What do I pair with the best cinnamon toast?
These are some of my favorite toppings and pairings for this cinnamon toast.

Whipped cream (my favorite)
Whipped cream cheese (second favorite)
Mascarpone
Fruits (love strawberries!)
Glass of milk
Coffee or tea
Best Cinnamon Toast - Sweet, crunchy, salty and delicious cinnamon toast with a crunchy, caramelized surface like Creme Brulee! Perfect for dessert or breakfast!Save

Here are some tips to get perfect cinnamon toast
Make sure to mix the butter, sugar, cinnamon and seal salt really well. You can use this cinnamon butter right away, OR you can store it in the fridge for later.
You don’t have to spread a thick layer of cinnamon butter to get perfect results either. Just a thin, even layer will do. Make sure to butter the edges of your toast as well.
Use a non-stick pan or cast iron pan. The last thing you want is to have the caramel stick to your pan. I always use my non-stick pan, so that my cinnamon toast caramelizes properly without sticking to the pan.
As the butter melts, you’ll notice that it spreads out a little on the pan. So move the toast around on the pan to catch that melted cinnamon butter. This will ensure that the surface of your toast is evenly coated as it cooks.
When the cinnamon toast is ready, place the toast on parchment paper or a silpat. If you only buttered one side of your toast, then place this buttered side on the silpat or parchment paper. As the toast cools down, the surface will flatten creating a shiny caramel surface.
I prefer to use country style bread loaves to make these creme brulee toast, because I can cut 1/2 inch thick slices of bread. But you’re welcome to use any bread you like – such as white bread, whole wheat, bagel, multigrain or anything else you have at hand.
Best Cinnamon Toast - The inside of a cinnamon toast is soft and butter, while the surface is crunchy with the caramel. Save

In case you missed out – here is a decadent dessert or brunch recipe using these cinnamon toasts! These roasted blueberry and brie with cinnamon toasts, are sure to blow your mind!

One slice of cinnamon toast topped with melted brie and a generous amount of roasted blueberry compote ontop, on a white plate.Save


THE BEST CINNAMON TOAST

COURSE: BREAKFAST, BRUNCH, DESSERT PREP TIME: 10 MINUTESCOOK TIME: 15 MINUTESCOOL DOWN: 2 MINUTESTOTAL TIME: 25 MINUTESSERVINGS: 10 SERVINGSCALORIES: 261 KCALAUTHOR: DINI
Makes 8 - 10 one sided cinnamon toasts, or 4 - 5 double sided toasts.


INGREDIENTS

CINNAMON BUTTER
4 oz unsalted butter softened
4 oz of white sugar about ½ cup
1 tsp ground cinnamon
½ tsp sea salt should be finely ground salt

OPTIONAL
½ tsp vanilla
⅛ tsp nutmeg
¼ tsp paprika

CINNAMON TOAST
4 slices of bread about ¾ inch - 1 inch thick
Extra butter if you’re making one sided cinnamon toast

TO SERVE
8 oz cream cheese softened
½ cup chilled cream
Fresh fruit like raspberries, strawberries, blueberries
US Customary - Metric

INSTRUCTIONS
CINNAMON BUTTER
Place all the ingredients in a bowl.
Using a teaspoon, gently mash the butter along with the sugar and cinnamon. Add any other optional add-ins. Mix until well combined. Set aside until needed.

CINNAMON TOAST
Line a wire rack or baking tray with parchment paper or a silpat.
For one sided toast - lightly butter one side of the bread slice. Spread an even, thin layer of cinnamon sugar on the other side, making sure to get the edges as well.

Heat a non-stick pan over medium - medium high heat.

When the pan is hot, place the bread with the buttered side down. Toast the bread for about 4 minutes until that side is caramelized and slightly toasted.

Flip the bread over and caramelize the toast on the cinnamon buttered side. After about a minute, gently move the cinnamon toast around on the non-stick pan in small circles to mop up any excess butter and sugar on the pan. Toast for about 3 - 4 minutes, until the sugar has caramelized and darkened in color. Make sure to not burn the toast.

When the cinnamon toast is ready, place it on the parchment paper lined tray, with the caramelized side down. Let it cool slightly.

For two sided toast - spread an even, thin layer of cinnamon sugar on both sides of the bread, making sure to get the edges as well.

Heat a non-stick pan over medium - medium high heat.

When the pan is hot, place the bread in the pan. The butter will start to melt, and puddle around the toast. After about a minute, gently move the cinnamon toast around on the non-stick pan in small circles to mop up the excess butter and sugar on the pan. Toast for about 3 - 4 minutes, until the sugar has caramelized and darkened in color. Make sure to not burn the toast. Flip the toast over and repeat on the other side.

When the toast is caramelized on both sides, place it on the parchment paper lined tray with the presentation side (serving side) down. Let it cool slightly.

TO SERVE
WHIPPED CREAM CHEESE
Whisk the cream cheese and whipped cream together until the cream cheese is light. Refrigerate until needed.

TO SERVE
Wash and dry the fruits.
Serve the cinnamon toast with some whipped cream cheese and fresh fruit. 


source: https://www.theflavorbender.com/caramelized-best-cinnamon-toast/


Is there anything better than warm, bubbling pie fresh from the oven? Maybe not. But this super easy blueberry peach tart is sure to give an...


Is there anything better than warm, bubbling pie fresh from the oven? Maybe not. But this super easy blueberry peach tart is sure to give any pie a run for their money.

Sweet, fruity, and topped with vanilla glaze – this dessert just screams SUMMER!


Hello my friends, Happy Saturday! Do you have anything fun on the books for this weekend? After last weeks very fun but c-r-a-z-y weekend in Princeton I am looking forward to some rest and relaxation. I’m hoping to finish a book, spend some time at the farmers market, and maybe even squeeze in a light hike on Sunday afternoon. Fingers crossed it’s the mellow few days my heart and mind are after.


Now, down to business: let’s talk about this Easy Blueberry Peach Tart with Vanilla Glaze.

Juicy peaches + plump blueberries + flaky crust + vanilla… sounds pretty amazing, right?!

Spoiler Alert: IT IS AMAZING!


The number one thing I love about this recipe? It’s so forgiving and easy. <—- I guess that’s actually two things, but you know what I mean?!? With this recipe you can take a deep breath, let the panic go, and really enjoy the whole process of making this dessert because the crust is already made for you; pastry puff, my friends, is such a wonderful thing! You will need to let the pastry puff thaw for 15-20 minutes before folding it out, so keep that in mind when planning to bake this. After that you’ll just fold it out, fill it with fruit, and bake it to sweet golden perfection.

This Blueberry Peach Tart will get you all the ooohs and aaaahs without any of the labor called for in traditional pie making. It’s a beautiful thing. Especially when you’re not in the mood to pump that elbow grease 😉


The humble tart before baking…

The hypnotizing tart after baking…

As a avid lover of Summer fruits, I knew I wanted to load this baby up with the finest of the season. With peaches at their prime and blueberries just beaming with beauty, they were an easy choice for this Summer tart. In terms of flavor these fruits compliment each other perfectly, resulting in a tart that’s plenty fruity and not-too-sweet.

You’ll be thrilled to know the ingredient list for this recipe is short and basic. For the crust you’ll need pastry puff and an egg (you’ll make an egg wash); for the filling you’ll need blueberries, peaches, cinnamon, cornstarch, sugar, and vanilla; and for the vanilla glaze you’ll need confectioners’ sugar, vanilla, and a few tablespoons of heavy cream (or milk). No fancy or hard to find ingredients in this one.


See that? That’s my heart right there. Sticky sweet vanilla glaze drizzled generously over the peaches and blueberries that are baked beautifully into a flaky, buttery crust.


I hope your heart, eyes, and mind have convinced you to make this beauty asap! If you’re feeling extra indulgent try adding a few teaspoons of bourbon to the vanilla glaze. <— so naughty; so niiiiiice.


Easy Blueberry Peach Tart with Vanilla Glaze

prep 20 minscook 20 minstotal 40 mins
author bakerbynature

yield 1 large tart, 6 slices

A fresh and fruity tart loaded with peaches and blueberries. Topped with a vanilla glaze, this tart is perfection!

Ingredients
1 sheet of puffed pastry, thawed for 20 minutes
1 large egg
1 tablespoon water
3 large peaches, peeled, pitted, and thinly sliced
1 1/2 cups fresh blueberries
1/4 cup granulated sugar
1/4 teaspoon salt
1/4 teaspoon cinnamon
1 teaspoon cornstarch
For the Vanilla Glaze:
1 cup of confectioners' sugar
1 teaspoon vanilla extract
2 tablespoons of milk OR heavy cream, more if needed to achieve desired consistency

Instructions

Remove 1 sheet of puffed pastry from the freeze; thaw for 15-20 minutes at room temperature, or until it can easily be unfolded without cracking.
Preheat oven to 400°(F). Line a large baking sheet with parchment paper; set aside.
In a small bowl combine the egg and water; beat until well combined; set aside.
Thinly slice peaches and place them in a large mixing bowl. Add in the sugar, salt, cinnamon, and cornstarch; toss well ensuring all peaches and are coated in the cinnamon sugar mix; set aside.
Gently unfold the puffed pastry. If it does crack, gently press the tears back together and mend with slightly wet fingers.
Place puffed pastry on prepared baking sheet.
Layer the peaches evenly (and very tightly) on the puffed pastry, making 3 tidy rows, leaving a 1" border around the pastry. Sprinkle the blueberries on top.
Lightly brush exposed pastry crust with egg wash.
Bake for 16-18 minutes, rotating once during baking, or until the crust is puffed up and golden brown and the peaches are tender.
While the tart bakes, make the vanilla glaze!
In a small bowl combine the confectioners' sugar, vanilla, and cream; whisk until smooth, adding more cream as needed to reach desired consistency. Drizzle over the tart right before serving.
Serve warm with vanilla glaze and maybe even a scoop of ice cream!?

Notes
Be sure to leave a one inch boarder around the tart, this helps ensure the edges don't get soggy.


source: https://bakerbynature.com/easy-blueberry-peach-tart-with-vanilla-glaze/

This content may contain affiliate links. We earn a commission at no extra cost to you if you make a purchase. We may earn money, free servi...


This content may contain affiliate links. We earn a commission at no extra cost to you if you make a purchase. We may earn money, free services or complementary products from the companies mentioned in this post. All opinions are ours alone.

Because school starts so early for our kids, morning tends to be pretty rushed, meaning breakfast isn’t always the most elaborate (not that many of my meals are, to keep it real). One of our favorites that we work into our menu as often as is practical is not only a really budget-friendly recipe, but also super delicious. You can whip up these Simple Crepes for the whole family for breakfast, snack or even a dessert!

This isn’t as much of an easy breakfast recipe as cereal, smoothies or even some of my oatmeal recipes I’ve shared – but once you whip up the batter really quick it’s just a matter of cooking and dishing up!

These crepes are one of the dishes that EVERYONE in the family loves, and asks for seconds. And thirds – and sometimes my kids will even eat five or six of them! Yup, definitely a winner in my books. We mix up the toppings and drizzles sometimes, but the overall favorite so far has been strawberries, whipped cream and chocolate syrup drizzled on top. Makes me think of my Chocolate Crepes with Strawberry Cream!

Note: We have 6 people in our family, who eat a LOT of these (like I said above, my kids sometimes eat 4-6 each) so we make a big batch. This recipe is what WE use to feed our family, and we often have about 6 large crepes leftover. If you have a smaller family, or they won’t eat as much, just divide the recipe as needed.

Ingredients
4 tbsp. Sugar
8 tbsp. Coconut Oil, melted
2 tbsp. Vanilla Extrat
Dash of Salt
8 Eggs
4 cups Milk
2 cups Water
4 cups All-purpose Flour
Toppings of Choice

Note: I use my blender to mix the batter, just breaking into thirds so it fits. You can use a mixer, too.

Directions
Combine all of the ingredients in either your blender (divide into thirds or quarters so it fits – make sure to have even liquid/solid to get it well mixed) or a larger bowl or mixer. Blend/mix very well so it’s no longer lumpy
Take a frying pan (we get 4 going at a time to be quicker, and it’s just different sizes), spray it with cooking spray, then heat up over medium-low heat. For large pans (like 10-14 inch) I do about 1/2-3/4 cup batter. More = thicker crepe, less = thinner crepe.
When the edges are starting to come up and the crepe slides a bit when you shake the pan side to side, it’s time to flip it over. Don’t over cook!
Spray your pan before each crepe, and continue through the batter. Serve warm with toppings of your choice!

With 4 pans going, it doesn’t take long to flip through these simple crepes – it’s just a matter of staying alert to make sure they don’t burn! Adjust the heat as necessary as the pan gets hotter, or if there’s a thinner crepe.


source: https://busymomshelper.com/simple-crepes

The only thing better than a toasty grilled cheese sandwich filled with gooey melted cheese on the inside, is a Parmesan Crusted Grilled Che...


The only thing better than a toasty grilled cheese sandwich filled with gooey melted cheese on the inside, is a Parmesan Crusted Grilled Cheese Sandwich with the most incredible crispy garlic Parmesan crust on the outside!

Today I’m beyond excited to share my Parmesan Grilled Cheese Sandwich with you guys! I’ve always been a HUGE lover of grilled cheese sandwiches because who could ever resist ooey gooey cheese nestled between golden brown buttery bread? Not me!

Let me tell you though, the crust on my Parmesan Grilled Cheese Sandwich is so stinkin’ divine! It’s so good your going to sink back into your chair, close your eyes and fall in love! Something magical happens when you combine the soft melted cheese on the inside with that crispy, golden brown, buttery and cheesy crust on the outside!

Well, by now you know that I married a dairy farmer and have lived on this stinky ol’ farm for almost twenty years! I can’t believe it’s been that long since I agreed to live here with all these cows, flies, crazy hours, and pretty much be joined at the hip with this farm!

After I met Justin and he told me he was a dairy farmer I think my heart sunk a little! He was a really great guy but I just didn’t want to be married to a filthy dirty, no days off, muck boot wearing dairyman!  

Right after I decided my heart didn’t need to be sunken I told him that I’d actually been supporting him for many, many years!

I was convinced I was single handedly supporting the entire dairy industry with my love of cheese! I can pound more cheese in a month than most people can pound in a whole year. Surely Justin was getting his a portion of my hard earned money I spend on cheese!

I’m seriously an addict. After I’ve been on vacation for a few days I start to really crave salty cheese! I add it to every single meal I make; pasta, scrambled eggs, cheese burgers, salads, mashed potatoes, and even pancakes (don’t knock it till you try it, it’s good)!

I’ll take cheese any way I can get it! But I have to admit that ultra comforting Parmesan Crusted Grilled Cheese Sandwiches will always be at the top of my list of favorite meals! It has not one, but two or more kinds of cheese and you can’t beat that!

Parmesan Grilled Cheese Sandwiches are still the same old super simple to prepare classic sandwich you fell in love with as a kid with a fun little twist!

Tips for making Parmesan Crusted Grilled Cheese Sandwiches

- Use soft butter
- Spread the butter one more time after you add parmesan cheese just to help everything to stick.
- Grill sandwich over medium heat so the bread doesn’t get browned before the cheese melts.
- Serve with jam…trust me it’s so flipping tasty!

How to customize your Parmesan Crusted Grilled Cheese Sandwich

- Use a variety of cheeses; Swiss, cheddar, pepper jack, provolone, or a combination.
- Add meat; deli ham, roast beef; grilled chicken, or bacon
- Switch up the seasonings used in the Parmesan crust; garlic salt, Salad Supreme, Mrs. Dash’s seasonings

Parmesan Crusted Grilled Cheese Sandwiches really are the ultimate comfort food! I pretty much made them twice in the last 12 hours because I happen to think they make a pretty darn good breakfast too!

If you want to help me support myself and the rest of the dairy industry whip up a Parmesan Crusted Grilled Cheese Sandwich! Oh, and I’d love to know what’s your favorite kind of cheese to use in grilled cheese sandwiches and what else you pile on it! Leave me a comment and share your ideas!

Parmesan Crusted Grilled Cheese Sandwich

Parmesan Grilled Cheese Sandwiches are everything you love about the classic plus they have the most scruptious buttery garlic and parmesan crust on the golden brown outside! I know you are going to love it...a lot!

Author     : Amy
Recipe type: Sandwich
Cuisine    : American
Serves     : 1

Ingredients

2 slices of bread
2 slices of cheese (such as cheddar, swiss, pepper jack, colby jack, etc.)
1-2 T. butter
1 T. grated parmesan cheese
dash garlic salt

Instructions

1.Spread butter one side of each slice of bread. Sprinkle butter side with garlic salt and parmesan cheese. I like to gently press and spread with a knife just to help ensure the paremesan sticks and stays in place. If it seems too dry you can always add and spread another thin layer of butter.
2.Build sandwich with buttered sides of bread on the outside and cheese slices in the middle.
3.In a nonstick pan grill over medium heat until golden brown. The parmesan will make the sandwich stick to the pan until it has formed a nice golden brown crust then it will be easy to flip!
4.Grill the other side.
5.Remove from heat.
6.Slice in half.
7.Serve immediately!


source : http://www.littledairyontheprairie.com/parmesan-crusted-grilled-cheese-sandwich/

But first – coffee. Spiked with a shot of espresso, this Mocha Almond Breakfast Smoothie is a nutritious way for coffee lovers to get their ...


But first – coffee. Spiked with a shot of espresso, this Mocha Almond Breakfast Smoothie is a nutritious way for coffee lovers to get their morning buzz!

Ingredients

1 cup Lifeway Cappuccino Lowfat Kefir
½ medium banana, sliced and frozen
1 Tbsp cocoa powder
1 Tbsp organic almond butter
¼ cup gluten-free rolled oats
Coconut whipped cream, to garnish (optional)
1 shot of espresso

Directions

1.Add all ingredients except for the optional coconut whipped cream into the pitcher of a high-powered blender. Blend on high until smooth, or until desired consistency is reached.
2.Garnish with optional coconut cream and a sprinkle of cocoa powder, if desired.

source : http://lifewaykefir.com/recipes/mocha-almond-breakfast-smoothie/?pp=1

This easy, dreamy baked creme brûlée french toast, thanks to its overnight prep, is so simple and so delicious. It’s bound to be a new break...


This easy, dreamy baked creme brûlée french toast, thanks to its overnight prep, is so simple and so delicious. It’s bound to be a new breakfast favorite!

Every year around Christmas time, I usually share a new holiday breakfast recipe perfect for a special breakfast. Emphasis on special. It’s very important that we all understand and know: ain’t nobody eating creme brûlée French toast on a Tuesday morning in my house.

We stick with our usual breakfast suspects during the week and save the special stuff…for special days.

I jumped the gun a bit and shared this baked Chocolate German Pancake a few weeks ago – it would be fabulous for Christmas morning, too.

But the real breakfast winner this holiday season is this overnight baked creme brûlée French toast.

Holy moly. It’s amazing.

And this is coming from someone who isn’t the biggest French toast fan on the planet. It ranks kind of low on my list of breakfast loves, but apparently, if you make it taste like creme brûlée, I’m going to be fighting young children for the leftovers.

Instead of doing full slices of bread, I opted to cut the bread into cubes and make more of a “bake” out of it instead of using full slices of bread. My main motive? Reduce the soggy factor.

I’m vehemently against soggy bread of all sorts (I’m so very sorry bread pudding – you’ll probably never have a place on my blog), but I love caramelized, golden pieces of bread lightly soaked in a sweet milk mixture.

Yes, that I like.

Keeping the crusts on the bread and cutting it into cubes helps this French toast bake reach absolute perfection.

As it bakes, the simple brown sugar syrup sitting under the bread cooks and bubbles and creates an absolutely magical creme brûlée crust for the tender French toast.

No extra syrup necessary, we serve this deliciousness with sweetened whipped cream and fresh raspberries and strawberries. The combo is spectacular.

The super simple overnight prep makes this holiday (or maybe lazy Saturday?) breakfast option a dream, especially since you take it out of the refrigerator and pop it in the oven as it preheats.

I will warn you, a 9X13-pan of this succulent French toast was pushing the limits on serving sizes for our family. Granted, I have five hungry boys (and two hungry girls!) to feed, but I’ve started doubling this for our family.

There are some leftovers doing it this way, but those easily get gobbled up later (ahem: lunch).

Creme brûlée is hands down one of my favorite desserts of all time, and this French toast version just makes me (and my whole family) so happy. This upcoming Christmas morning, I’m planning on serving it with these tasty Christmas Baked Eggs.

If you are looking for a special, fun breakfast for any of the upcoming holidays, let this be the one! You won’t be disappointed

OVERNIGHT CREME BRÛLÉE FRENCH TOAST BAKE

INGREDIENTS:

6 tablespoons butter
3/4 cup (5.5 ounces) packed light or dark brown sugar
2 tablespoons pure maple syrup (can sub corn syrup or pancake syrup)
6 (1-inch thick) slices French bread, cut into 3/4-inch cubes (see picture below the recipe)
4 large eggs
1 cup half-and-half
1 tablespoon vanilla extract
1/4 teaspoon salt
Sweetened whipped cream + fresh strawberries/raspberries, for serving

DIRECTIONS:

1.Add butter, brown sugar, and maple syrup to a microwave-safe bowl, and microwave for 1-2 minutes, until the sugar is dissolved. Stir to combine. (This step can be done in a pan on the stove.)
2.Lightly grease a 9X13-inch pan with cooking spray.
3.Spread the brown sugar mixture in the bottom of the pan and arrange the bread cubes in a single layer over the top.
4.In a bowl or liquid measuring cup, whisk together the eggs, half-and-half, vanilla, and salt.
5.Pour the mixture evenly over the bread.
6.Cover the pan and refrigerate overnight (8-10 hours).
7.Remove the pan from the refrigerator, uncover, and place in the cold oven. Preheat the oven to 350 degrees F. Once the oven reaches temperature, bake for 30-35 minutes, until the bread is golden and the caramelly syrup is bubbling (alternately, if you want the golden syrupy goodness on top, the french toast can be baked for 20 minutes, then using a large, flat spatula, flip the bread pieces and bake for another 10-15 minutes).
8.Serve immediately with sweetened whipped cream and fresh raspberries or strawberries.

NOTES:

I like my French toast on the firmer (read: less soggy) end of things (although it’s still plenty soft and delicious as written). However, if you like a softer/milkier/soggier French toast OR your bread is thicker than 1-inch slices, increase the half-and-half to 1 1/2 cups and use 5 eggs instead of 4.
Also, if you are using an artisan-style bread with heavy, thick crusts, consider cutting the crusts off the bread (no need to do that if the French bread you use is soft with a thinner crust).

source : https://www.melskitchencafe.com/overnight-creme-brulee-french-toast-bake/

close